INSTALLATION GUIDE
Installing PVC (Polyvinyl Chloride) and PU (Polyurethane) conveyor belts correctly is crucial for ensuring optimal performance, longevity, and safety. Here’s a step-by-step installation guide to help you through the process:
- Safety: Ensure all safety precautions are in place, including proper personal protective equipment (PPE) for those involved in the installation.
- Tools: Gather necessary tools such as wrenches, cutters, measuring tape, and marking tools.
- Belt Inspection: Check the belt for any damage incurred during transportation or storage.
- Clean Conveyor Bed: Ensure the conveyor structure is clean and free of debris or old belt remnants.
- Alignment: Align and adjust the conveyor frame and pulleys according to conveyor manufacturer specifications to ensure proper tracking and tensioning of the new belt.
- Measure and Cut: Measure the conveyor length and cut the new belt to size, leaving extra length for final adjustments.
- End Preparation: Prepare belt ends for splicing, ensuring they are straight and squared off.
- Choose Splicing Technique: Select the appropriate splicing method based on the belt type (PVC or PU) and belt manufacturer recommendations (e.g., cold bonding, hot vulcanization, mechanical fasteners).
- Follow Manufacturer Guidelines: Adhere strictly to the belt manufacturer’s instructions for splicing, including temperature, pressure, and curing times if using adhesive or vulcanization methods.
- Initial Positioning: Position the belt onto the conveyor structure, ensuring it runs smoothly and without twists or misalignment.
- Tensioning: Adjust the tension of the belt using tensioning devices or adjustment mechanisms provided on the conveyor frame. Follow recommended tension levels to prevent premature wear or damage.
- Run-in Period: Allow the belt to run-in for a period to settle and adjust.
- Tracking Adjustments: Make necessary tracking adjustments using tracking devices or adjusters on the conveyor frame to ensure the belt runs centrally and without deviation.
- Visual Inspection: Conduct a final visual inspection of the installed belt to ensure there are no defects, twists, or misalignments.
- Operational Testing: Run the conveyor with a light load initially to verify smooth operation, proper tracking, and belt performance.
- Documentation: Keep records of installation details, including belt specifications, splicing method, tension settings, and any adjustments made.
- Maintenance Schedule: Establish a maintenance schedule for regular inspections, cleaning, and belt tension checks to prolong belt life and ensure continued performance.
Safety Considerations
- Always follow safety protocols and guidelines during installation, especially when dealing with heavy equipment and moving parts.
- Ensure all personnel involved in the installation are trained and competent in conveyor belt handling and installation procedures.
By following these installation guidelines and manufacturer recommendations specific to PVC and PU conveyor belts, you can ensure a smooth and successful installation process that maximizes the performance and lifespan of your conveyor system.
Defining The Best
Conveyor Belt Installation
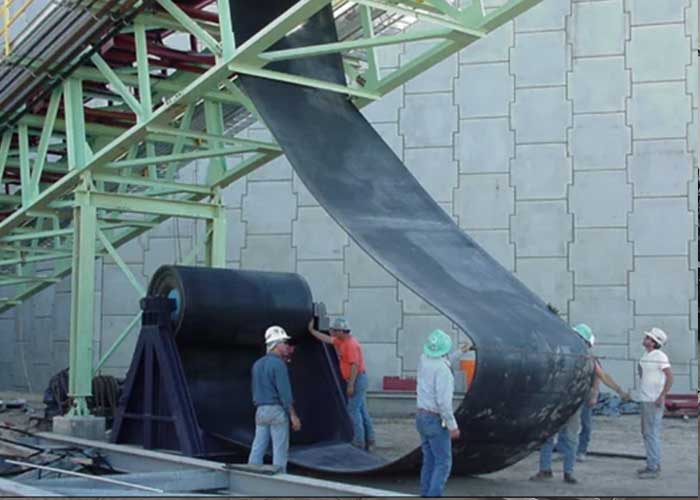
Once the roll of belting has been transported to the point of installation, it should be mounted on a suitable shaft for unrolling and threading onto the conveyor.
Conveyor belting is normally rolled at the factory with the carrying side out. Consequently, in mounting the roll, the belt must lead off the top of the roll if it is being pulled onto the troughing or carrying idlers, but off the bottom of the roll if it is being pulled onto the return idlers. When pulling the belt onto the conveyor, the roll will turn opposite the direction indicated by the arrows on the crate. Fig. 2 illustrates a suitable method of mounting, as well as leading off the top of the roll for pulling onto the troughing idlers.
Special Cases
In some cases, such as in mines where headroom does not permit maneuvering a roll, the belt may have to be pulled off the roll and reefed.
Extreme care should be exercised to see that the loops have large bends to avoid kinking or placing undue strain on the belt, and no weight should ever be placed on the belt when it is in this position. Ideally, supports should be placed at each end where the bends occur.
Installation
Installation, Maintenance & Troubleshooting Guide
Self-aligning conveyor and return idlers have already been described. Center pivoted return idlers are sometimes connected in groups of two or three to operate together and are actuated by an external mechanism that takes its indication from the belt position. They have a very strong influence in centering the return belt as it approaches the tail pulley.
A snub pulley also can be arranged to provide the same strong self-aligning influence; however, in place of a center pivot (as in return rolls), it is usually pivoted at one end of its shaft. The other end is shifted by mechanical, electrical or hydraulic means as indication is received from the belt position.
Normally, extra pressure is desired on self-aligning idlers, and in some cases, on standard idlers where strong training influence is required. One way to achieve this is to raise such idlers above the line of adjacent idlers. Idlers or bend pulleys on convex curves along the return run have extra pressure due to a component of the belt tension, and are therefore effective training locations. However, carrying side self-aligners should never be located on a convex curve, since their elevated position can promote idler juncture failure.
A belt having extreme lateral stiffness, relative to its width, will be more difficult to train due to its lack of contact with the center roll of the carrying idler. Recognition of this fact enables the user to take extra precaution and, if necessary, load the belt during training to improve its steerability. Observation of troughability design limitations will normally avoid this trouble.
Some new belts may tend to run off to one side, in a certain portion or portions of their length, because of temporary lateral mal-distributions of tension. Operation of the belt under tension corrects this condition in practically all cases. Use of self-aligning idlers will aid in making the correction.
Guides of this type are not recommended for use in making belts run straight. They can be used to assist in training the belt initially to prevent it from running off the pulleys and damaging itself against the structure of the conveyor system.
They also can be used to afford the same sort of protection to the belt as an emergency measure, provided they do not touch the belt edge when it is running normally. If they bear on the belt continually, even though free to roll, they tend to wear off the belt edge and eventually cause ply separation along the edge. Side guide rollers should not be located so that they bear against the belt edge once the belt is actually on the pulley. At this point, no edge pressure can move the belt laterally
Initial installation of conveyor equipment should ensure good alignment of all pulleys, troughing idlers and return idlers; that is, they should be placed at right angles to the direction of belt travel and should be leveled and centered on a straight line. First movement of the belt should be slow and intermittent so that any tendency of the belt to run off can be quickly observed and the belt stopped before damage occurs.
When the conveyor is a long center installation, men should be stationed at frequent intervals to observe the action of the belt. They should be provided with an effective method of communication so they can report their observations and if necessary, stop the belt.
Initial movement of the belt will indicate where corrections of the types described are required. The first corrections must be at points where the belt is in danger of being damaged. Once the belt is clear of all danger points, a sequence of training operations can be followed. Since the training will finally complete a circuit, just as the belt does, there is no point at which training can be started without the possibility of having to make subsequent corrections when returning to the starting point as the circuit is completed. The best procedure appears to be in starting with the return run and working toward the tail pulley. This ensures early centering of the belt on the tail pulley so that it can receive its load centrally, which is highly important.
If the belt is readily troughable so that its running tendencies are not erratic, the training can and should be completed on the empty belt. Should it tend toward stiffness and erratic running, getting some load onto the belt as soon as the return run has been straightened up and the belt is centered on the tail pulley will help hold the top run.
Normally, the belt can be trained properly onto the tail pulley by manipulation of return idlers and with the assistance of self-aligning return rolls. Seldom is any adjustment of snub or tail pulley necessary, but the snub can be used in supplementary training.
Training of the top run, with the belt empty, is usually no problem if the belt is readily troughable. In this case, selfaligners on top are not required, except as insurance in the region approaching the head pulley. There, two selfaligners placed approximately 40 and 80 feet preceding the pulley will help re-center the belt if it is forced off due to some temporary disturbance.
It should not be necessary to use the head pulley for training purposes if it has been aligned properly. Likewise, the snub following the head pulley should not be required as a training means, since it is relatively ineffective in its position following the strong head pulley influence.
The take-up carriage has a strong influence on the running of the belt at that point, and due to its movement as belt length changes, is subject to misalignment. A vertical take-up carriage, hanging in a festoon of belt, must be guided in its travel so that the pulley shaft remains horizontal. The belt cannot be depended upon to center itself on the pulley. Once it becomes off-center, the pulley will tip out of horizontal if not guided closely on its posts.
Crowning one or several pulleys in a belt system is the most common way of tracking a belt. For flat power transmission belts and narrow conveyor belts (200mm wide), a radius crown is used. For wider conveyor belts, typically, a trapezoidal crown is applied. Radius Crown Specifications for Flat Belt Pulleys A radius crown represents a great way to track a belt. Dimensionally, it does not take a big crown height in order for the belt to track properly, and exceeding the seemingly small amounts below will actually do more harm than good!n a system with multiple pulleys, crown the pulleys that turn the same way.